
This incredibly creative photo was taken by the talented Alin Petrus, and if you like this shot I highly recommend checking out his other works on his Alin's 1x website. The shadow in this photo could be created using gimp. To do this, it would take a little effort with shooting for the edits, and an understanding of layer masks and layer modes. Here are the steps that I would take to do this:
Take the photo of the girl holding the rose.
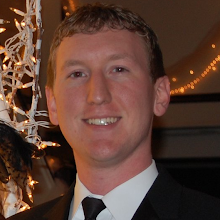
Take the photo of the boy on a white background so he is easy to remove from the background. It is recommended that you shoot in raw for this. For more information about the benefits of shooting in raw, check out the linked post. I also recommend that your boy wears all red for the shot, because that will also help. The next step will explain why.
Now, remove the boy from the background much like I removed my own face in the beginning of this gimp zombie tutorial. If you watch that video, you will realize that the secret to pulling the face out of the background rested upon darkening the color red. Your face has a lot of red pigment in it, so darkening that effects the body and not the white background. This is why wearing a red shirt will help this step a lot.
Now that you have isolated the child from the image, we're going to use his shape as a silhouette for an all black background on the image with the girl.
On your girl image, Insert the image of the black on white boy. Move him and scale him appropriately Right-click on the boy layer and click "add layer mask."
Now click "grayscale copy of layer, and then click colors>>>invert to invert the layer mask. This will turn your layer into a layer mask. Now that we have the image turned into a layer mask, we can remove the image and replace it with what we need it to be - all black.
Fill your layer with the color black. Our edge will be defined by our layer mask.
Remove the lower part of the feet and legs by painting in the color black. Move him so that the top
third of his legs are on the corner between the sidewalk and wall, if you haven't already.
Manually paint the legs in by painting your layer mask the color white in the areas that you want to add the legs to. This may require the use of the lasso tool or paths tool for more accurate drawing.
Set the layer mode to overlay.
Click on your layer mask, and click filters>>>blur>>>Gaussian blur
Add a slight blur to the layer mask to make it look more like a shadow.
Adjust the opacity as needed.
What do you guys think? Please share your results if you take the time to do this, I would love to see them. Also, if you have any questions or comments don't hesitate to ask!
a lot of talent and a nice pleasure to do it
ReplyDelete